Description
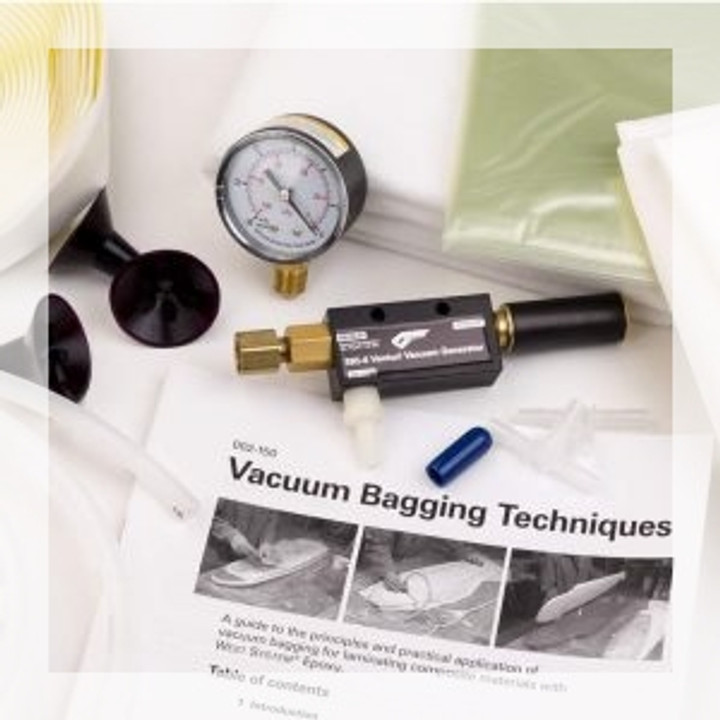
West System Vacuum Bagging Kit 885
A complete starter kit for repairs and small laminating projects up to 13 sq. ft.
Kit includes:
- Venturi vacuum generator
- 1/4" I.D. Vacuum Tubing (10')
- Vacuum Gauge (1)
- Junction "T" barbs (2)
- Release Fabric (15 sq. ft.)
- Breather Fabric (15 sq. ft.)
- Vacuum Bag Film (15 sq. ft.)
- Vacuum Bag Sealant (25')
- Complete kit instructions
- 002-150 Vacuum Bagging Techniques
Vacuum Bagging Instructions (pdf)
Vacuum Bagging Techniques manual (pdf)
Detailed list of Kit Contents
885-6* 1—Venturi Vacuum Generator with 885-7 Silencer. The Vacuum Generator develops over 20 inches
Hg (mercury) of vacuum (10 psi of clamping pressure) at .4 SCFM and is designed to run off of conventional shop air compressors that continuously deliver at least 65 psi at 3.5 SCFM. Some item specifications may vary. (A ¼” NPT male air fitting is required to connect to your air compressor.)
885-34* 3—Vacuum Cups. Cups are placed over a ½” “X” cut in the vacuum bag film and provide a port through the bag for the vacuum gauge or the vacuum tubing. 20 ft—885-4 ¼” I.D Vacuum Tubing. Cut tubing to the appropriate length, to connect the vacuum cups to the generator and make a resin trap.
885-5 1—Vacuum Gauge*. The Gauge screws into a vacuum cup and is placed over a ½” “X” cut in the vacuum bag film. Vacuum measurement is expressed in inches of mercury (0-30 Hg). Each increase of 1 inch of mercury (a single increment on the gauge) indicates an addition of about seventy pounds of pressure per sq ft (.48 psi) at sea level.
2—Junction “T” barbs. T’s are used to connect tubing lines and cups. May be used to place a resin trap just ahead of the venturi intake.
15 sq ft—Release Fabric. Release fabric peels cleanly away from the cured epoxy. Cut it to fit an area larger than the repair area or saturated laminate layup.
15 sq ft—Breather Fabric. Placed over the release fabric, under the vacuum bag to provide an air passage for air to get to the port.
25 ft—Vacuum Bag Sealant. Apply sealant continuously around the outside of the release fabric area to seal the vacuum bag over the layup.
15 sq ft—Vacuum Bag Film. The film is cut larger than the area outlined by the sealant, to which the perimeter of the film is tightly sealed. Pieces of sealant are used to plug any buckles in the film or gaps in the seal.
002-150 Vacuum Bagging Techniques. A 52-page manual that describes the basic principles and practical application of vacuum bagging for repair and laminate construction.
What is vacuum bagging?
Vacuum bagging is when a composite that is laid up and wet out by hand is then put under vacuum to compact the laminate and force out excess epoxy. Vacuum bagging has been a choice method of manufacturing and repairing composites for a long time.
Why vacuum bag a laminate?
The process of vacuum bagging allows for the ease of hand lamination while producing a part that has better properties because of its compaction. Vacuum bagging a laminate removes air voids and increases the fiber-to-epoxy ratio. All in all, it is a great process to improve your composite laminate.
 The correct order in which to place vacuum bagging materials. Note vacuum bag film is the top layer.
What materials do I need for a vacuum bag operation, and how do I use them?
The Vacuum Bagging Kit contains everything you need for successfully vacuum bagging laminating projects up to 13 square feet at room temperature. Let’s dive deeper into what materials are used in vacuum bagging and how to use those materials to achieve a great composite part. The materials and how to use them will be described in the order they should be put down on the mold or laminate.
Sealant tape
Lay down a layer of sealant tape around the perimeter of the part, leaving some space between it and the laminate. The area where the tape is put down should be clean and free of epoxy residue and stray fibers. Sealant tape is also commonly referred to as tacky tape or mastic sealant.
Release fabric
Release fabric should be laid directly on top of the wet laminate. Release fabric leaves a textured finish when it is removed, reducing the need for surface prep before secondary bonding. Release fabric is commonly referred to as peel ply. The most common types of peel ply are made out of nylon or polyester fibers. Some peel ply is coated with release agents.
Release film
Perforated release film is a thin plastic with small holes that control how the excess epoxy moves from the part to the breather fabric. This is an optional layer in the vacuum bagging process.
Breather fabric
The function of the breather fabric is really two-fold. As vacuum pressure consolidates the laminate, the squeezed-out epoxy goes through the peel ply (and the release film if you are using it) and is absorbed by the breather fabric. Because of its open structure, air flows easily through breather fabric allowing the air to be evacuated from the consolidated laminate. Breather fabric is also referred to as baby blanket.—Excerpted from Vacuum Bagging Basics by Rachael Geerts, Epoxyworks 49
Warranty Information
Specs
UPC: |
811343012533 |
|
MPN:
|
885
|
Description: |
Kit |


